Summer is a great time to get creative – with warmer weather and the kids on vacation, there’s a bit more time for crafting. Transform some garden planters by turning them into fun clay pot people. Since Independence Day is during the summer, you could also incorporate some patriotic themes into your piece. Check out these ideas for some inspiration.
1. Terracotta Turtle Planter

Looking for an adorable and creative way to display your plants? This DIY Terracotta Turtle Planter is the perfect addition to any garden, porch, or patio! With just a few simple materials, you can transform basic terracotta pots into a charming turtle-shaped plant holder that adds personality and greenery to your space.
Supplies
- 1 large terracotta saucer (this will be the turtle’s shell)
- 4 small terracotta pots (about 4 inches each) (these will be the legs)
- 1 smooth Styrofoam or craft foam ball (for the head)
- Acrylic paint in greens
- A small sponge (for creating the turtle shell pattern)
- Scissors or an X-Acto knife (to shape the sponge)
- E6000 glue
Instructions
First, flip the saucer over and paint it and the small pots green. Then, cut a small sponge into a square with rounded edges. Dip it in light green paint and dab it on the saucer to make a turtle shell design. Leave some space between the patterns. Next, glue the small pots under the saucer to make legs. Let the glue dry overnight. For the turtle’s head, take a foam ball and cut one side flat. Paint it dark green and add eyes with white and black paint. Glue the head to the front of the saucer and let it dry completely. If you want to put your turtle outside, use waterproof sealant to protect it. Then, you can put a plant inside the saucer.
2. DIY Piggy Planter

Transform a simple terracotta pot into an adorable pig face that’s both cute and functional! Whether you use it to plant flowers, succulents, or herbs, this pig-themed planter will add a touch of farmhouse charm to your space.
Supplies
- 1 terracotta pot (size of your choice)
- Acrylic paint (light pink, dark pink, black, white)
- Paintbrushes (small and medium-sized for details)
- Foam or cardstock (for ears)
- Hot glue gun & glue sticks
- Scissors
- Pencil (for sketching design before painting)
Instructions
Paint the entire pot with light pink acrylic paint using a medium-sized brush. Using a pencil, lightly sketch the pig’s eyes, nose, cheeks, and smile onto the pot.
Fill in the nose using dark pink paint, adding two black ovals for nostrils. Paint two white ovals for the eyes and add black pupils with a small white dot to give them a cute, lively expression.
Add pink circles for the cheeks and a black curved line for the smile to give your pig a friendly look. Cut two ear shapes out of foam or cardstock. Paint them light pink on the outside and add a darker pink inner ear for contrast.Once dry, use a hot glue gun to attach the ears inside the rim of the pot. Position them slightly outward for a playful look.
3. Clay Pot Cow Planter

With its cute cow face, dangling arms and legs, and a mini plant on top, this craft makes a fantastic garden decoration, porch decor, or even a unique gift!
Supplies
- 5 terracotta pots (1 large for the body, 1 medium for the head, 2 small for the legs, and 2 mini for the arms)
- Acrylic paint (white, black, pink, blue, and a touch of brown)
- Paintbrushes (small and medium-sized for details)
- Foam or cardstock (for ears and horns)
- Hot glue gun & glue sticks
- Twine or strong string (to attach arms and legs)
- Bell charm (optional, for a cute cowbell effect!)
- Clear matte or glossy sealant (optional, for outdoor durability)
- Small plant (for the top of the cow’s head)
Instructions
Start by painting your terracotta pots white and letting them dry. Then, use black paint to make cow spots on the big and small pots. Have fun with the shapes! Paint the bottoms of the small pots black to look like hooves. On the medium pot, which will be the head, paint a big pink oval for the snout. Paint two black dots for nostrils, a happy curved smile, and big blue eyes. Once the eyes dry, add tiny white spots to make them look even more alive. You can also add a bit of brown paint around the eyes and snout for a 3D effect.
For the legs and arms, cut four pieces of twine and tie a knot at each end. Thread two pieces through each small pot for legs and two through each mini pot for arms. Tie the twine inside the big pot and use hot glue to keep it in place. Then, put the medium-sized head pot upside down on top of the big pot. You can use hot glue to make sure it stays in place if you don’t want it to move. If you’d like, you can also add a small bell charm around the neck area for a cute touch!
Next, cut two ear shapes from foam or cardstock and paint them white with a pink section inside. Cut small horn shapes, paint them light brown or gray, and let them dry. Use hot glue to attach the ears and horns to the head pot. Make sure to position the ears slightly outwards for an adorable look.
Finally, choose a small plant like succulents, grass, or flowers to put in the top head pot. This will look like the cow’s hair or tuft of grass.
=
4. Coastal Clay Pot Lighthouse
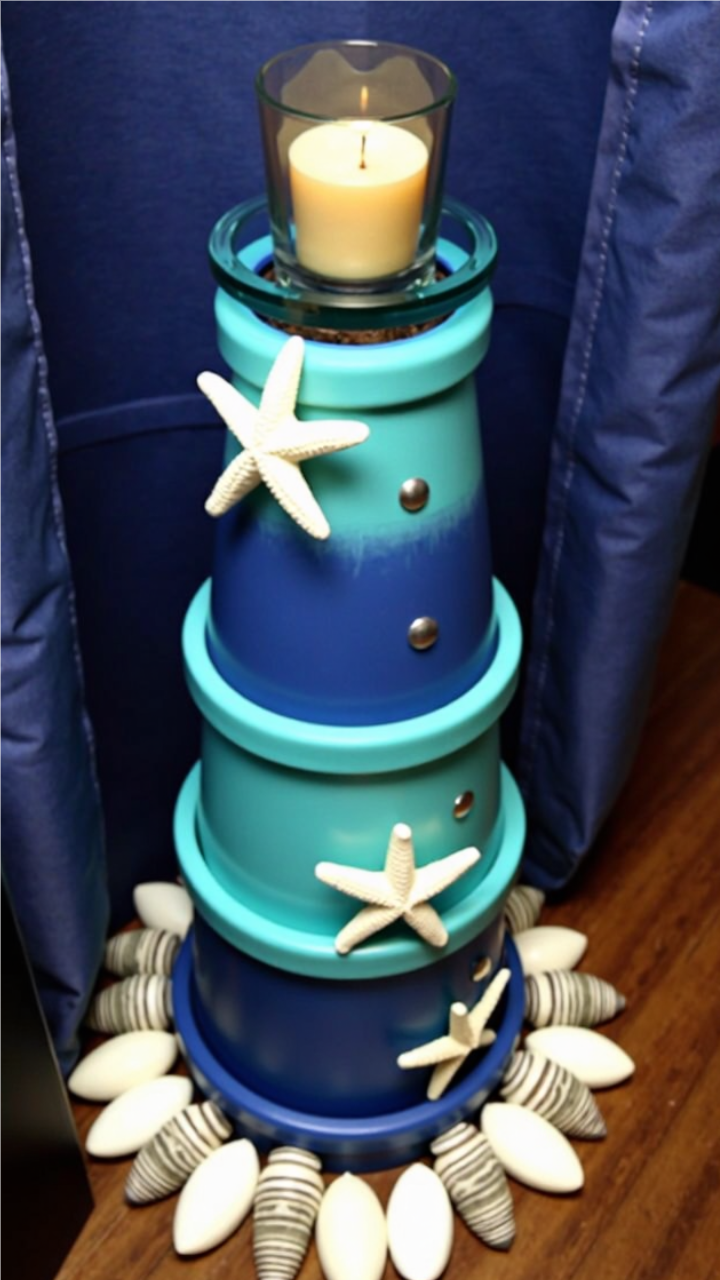
Bring a touch of the ocean breeze to your home or garden with this stunning DIY Coastal Clay Pot Lighthouse.
Supplies
- 3 terracotta pots (small, medium, and large for stacking)
- Acrylic paint (shades of blue, turquoise, or any coastal colors)
- Paintbrushes (small and large)
- Hot glue gun & glue sticks
- Nautical decorations (starfish, seashells, small pebbles)
- Small glass candle holder & candle
- Metallic embellishments (optional, for added detail)
- Clear sealant (for durability, especially if placing outdoors)
Instructions
First, paint each terracotta pot in blue and turquoise. You can make them fade from one color to the other or choose strong contrasting colors. To make the pots look weathered, sponge on a little white or lighter blue paint around the edges. Make sure the paint is completely dry before moving on to the next step.
Now it’s time to stack the pots to create the lighthouse. Turn the biggest pot upside down and use hot glue to stick the medium-sized pot on top. Repeat this process with the smallest pot to make the top part of the lighthouse.
Next, add some nautical decorations by gluing starfish and seashells to the lighthouse. You can also scatter small stones or pebbles around the base for a cute touch. If you want, you can even add shiny things to look like windows or bolts on the lighthouse.
Finally, create the light by placing a small glass candle holder on top of the smallest pot. You can use a real candle or an LED light to make it flicker like a real lighthouse.