Gnomes are so adorable and a great craft to get kids involved with. Make them for any season such as Easter or Christmas for example. You can make DIY Bunny Gnomes to decorate your home for Easter or Christmas tree gnomes for the winter! The supplies needed include faux fur and a wooden bead for the nose. You can place rice into a sock to form the body. Secure it with an elastic band and secure with hot glue. Cut some faux fur to cover this with. Glue the wooden bead at the nose area and then hot glue a sock for the hat to finish it.
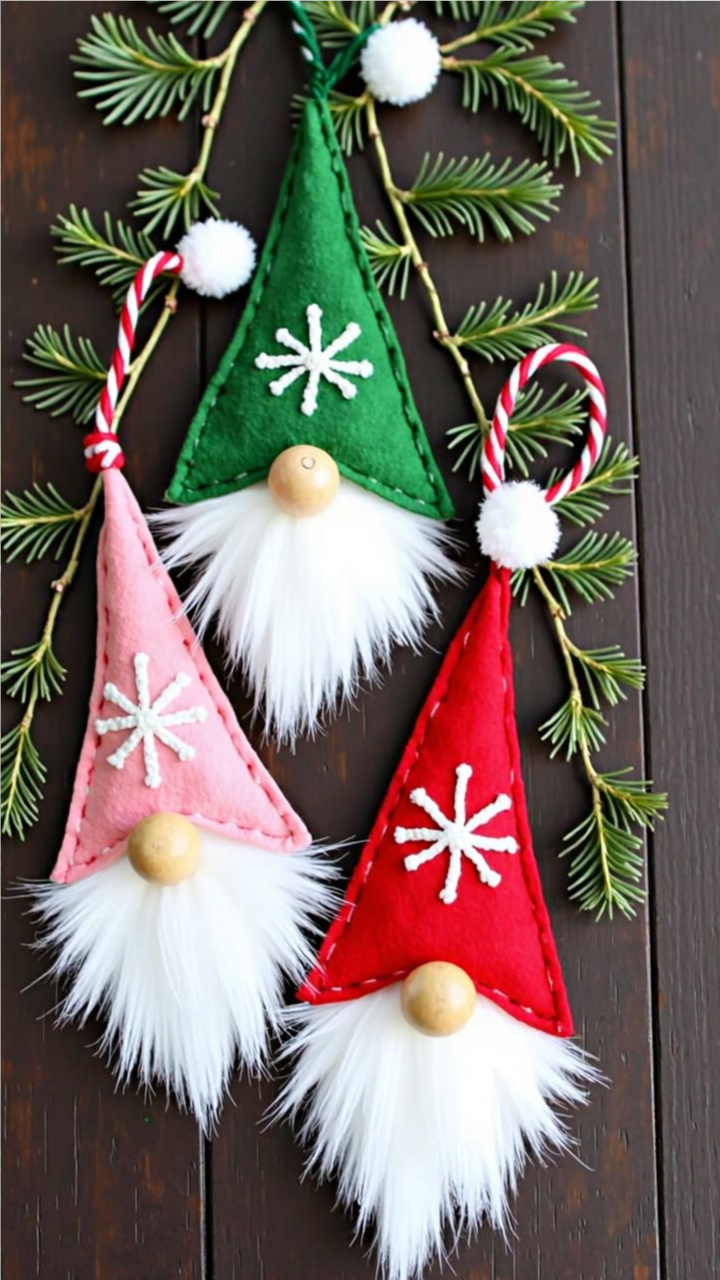
Nothing says Christmas magic like adorable handmade ornaments! These DIY Felt Gnome Ornaments are a fun and festive addition to your tree, gift wrapping, or holiday decor. With cozy felt hats, fluffy beards, and a rustic wooden nose, these Scandinavian-inspired gnomes bring warmth and charm to any space. Plus, they’re easy to make—perfect for a craft night or a family-friendly activity!
Supplies
- Felt Fabric (Red, Green, Pink, or any festive colors)
- Faux Fur Fabric (for the beard)
- Small Wooden Beads (for the nose)
- Embroidery Thread & Needle (for decorative stitching)
- Hot Glue Gun & Glue Sticks
- Twine, Ribbon, or Candy Cane Cord (for hanging)
- Scissors
- White Puffy Paint or Embroidery Floss (for the snowflake design)
- Small Pom-Poms (optional, for the hat tip)
Instructions
Cut a triangle-shaped piece of felt for the gnome’s hat. Cut a small triangular piece of faux fur for the beard. Use white puffy paint or embroidery floss to add a snowflake design on the hat.Let it dry completely before assembling.
Glue the beard onto the bottom of the felt hat. Glue a wooden bead at the center where the beard meets the hat—this becomes the nose!

These DIY Paper Gnomes are the perfect holiday activity! With simple materials like paper, glue, and yarn, you can create adorable little gnomes in bright colors.
Supplies
- Colored Cardstock or Construction Paper (Red, Green, Blue, or any festive colors)
- Empty Toilet Paper Rolls
- White Yarn or Paper Strips (for the beard)
- Small Wooden Beads or Pom-Poms (for the nose)
- Scissors
- Glue or Hot Glue Gun (adult supervision required)
Instructions
Take an empty toilet paper roll and wrap it with a piece of colored paper (use glue or tape to secure it). This forms the gnome’s body.Cut a large triangle from colored cardstock. Roll it into a cone shape and glue or tape the edges together.
Set it aside to let it dry. Cut strips of white paper or yarn to make a fluffy beard. Glue the pieces to the top of the toilet paper roll, allowing them to hang down.Glue a wooden bead or pom-pom near the top of the beard (just below the hatline). Place the cone-shaped hat over the top of the roll, covering where the beard is attached. Secure it with glue.
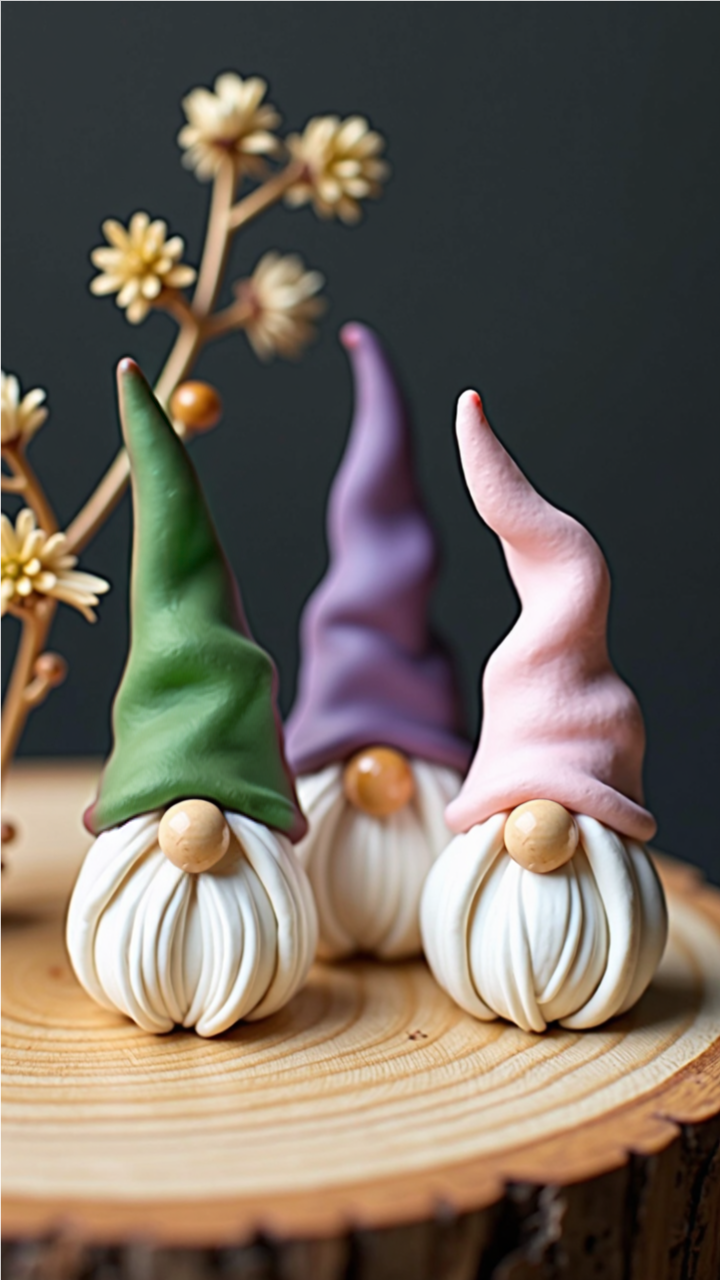
These handmade polymer clay gnomes are an easy and delightful project that kids and adults will love.
Supplies
- Parchment Paper (for a non-stick surface)
- Baking Sheet (to bake your gnomes)
- Polymer Clay in: Grey (for the body), White (for the beard), Tan (for the nose) Colors of choice (for the hat)
- Mod Podge (to seal and protect your gnome)
- Clay Cutting & Piercing Tools (or toothpicks)
- Paint Brush (for applying Mod Podge)
- Oven (for baking the clay)
Instructions
First roll a small ball of grey clay into a long, narrow shape. Then, roll a ball of colored clay into a cone and place it on top of the grey shape. Next, shape a ball of white clay into a triangle and attach it to the front of the body. Use a tool or toothpick to make lines in the beard. After that, add a small ball of tan clay as the nose, just below the hat. Put the hat over the body and nose. Bake the gnome according to the clay instructions and let it cool. Finally, add a thin layer of Mod Podge to protect it and give it a shiny finish.

Bear with bunny gnome tee shirt


Absolutely love these!
Thanks Jodie !