Halloween is just around the corner, and there’s no need to break the bank to create a festive and spooky atmosphere! With a little creativity and a quick trip to the dollar store, you can craft some amazing DIY Halloween decorations that will wow your guests and trick-or-treaters. Check out these fun, budget-friendly ideas to transform your home into a haunted masterpiece.
1. DIY Spooky Pool Noodle Candles
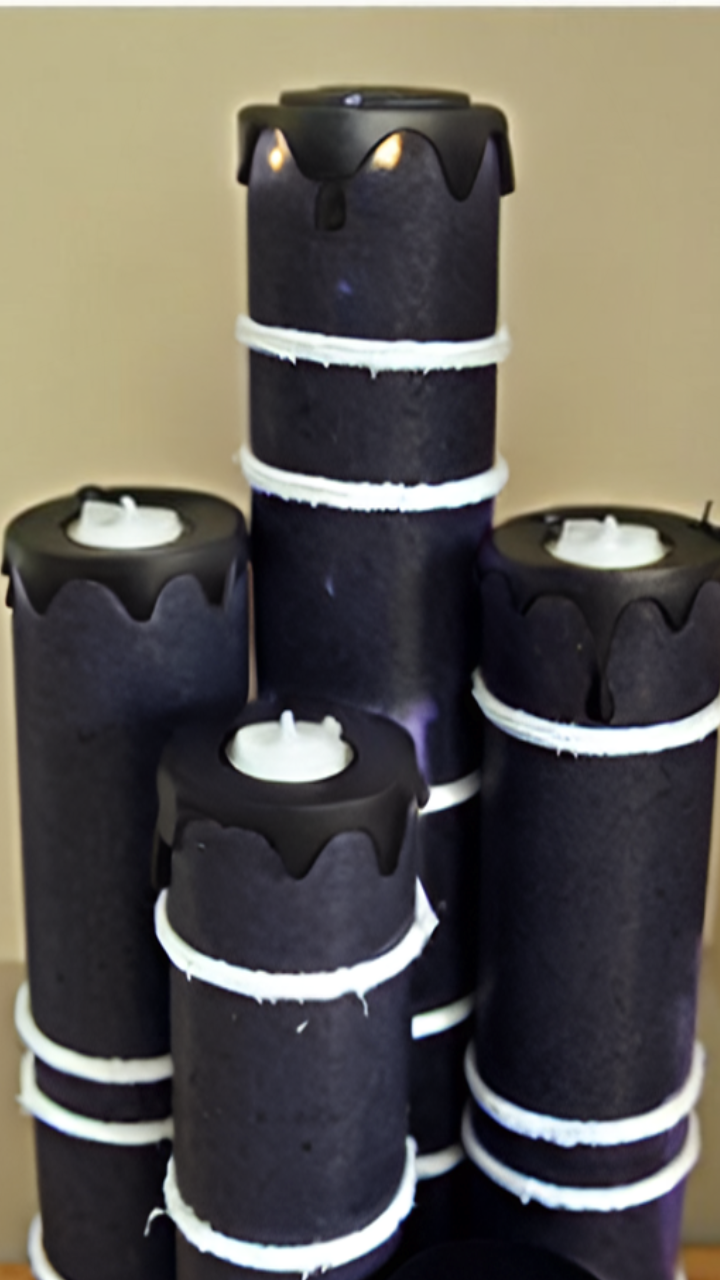
These DIY spooky pool noodle candles are an easy and budget-friendly way to add a gothic touch to your space. Whether you’re setting up a haunted house or creating a mysterious ambiance, these candles are a must-try!
Supplies
- Pool noodles (black or any color you can paint black)
- LED tea lights
- Hot glue gun and glue sticks
- Black acrylic paint or spray paint
- White twine or rope (optional, for added detail)
Instructions
Cut the Pool Noodles
Use scissors or a craft knife to cut the pool noodles into different lengths for a tiered candle effect.
Ensure the top of each piece is flat so the LED tea lights can sit securely.
Paint the Pool Noodles
If your pool noodles are not black, paint them using black acrylic or spray paint.
Let them dry completely before moving on to the next step.
Create the Melted Wax Effect
Use the hot glue gun to drizzle glue around the top edge of each pool noodle to mimic melted wax.
Allow the glue to dry completely before painting over it with black paint for a seamless look.
Add the LED Tea Lights
Place an LED tea light into the top opening of each pool noodle candle.
Ensure it fits snugly so it doesn’t fall out.
Decorate with Twine (Optional)
Wrap white twine or rope around the candles for added detail and a vintage gothic feel.
Final Touches & Display Ideas
Arrange the candles in clusters of varying heights for a dramatic effect.
Place them on mantels, shelves, or entryway tables to enhance your Halloween decor.
Use them as a centerpiece for a spooky-themed party or dinner.
Pair them with cobwebs, skulls, or faux pumpkins for a complete haunted look.
2. Skeleton Bath Decor

For an extra spooky yet hilarious addition to your Halloween decor, try this skeleton bath display! Perfect for a bathroom or entryway setup, this fun idea is easy to make with just a few supplies.
Supplies
- 1 small skeleton (from the dollar store)
- 1 small metal tub or bucket
- Batting for stuffed animals (or cotton filling for bubbles)
Instructions
Place the small metal tub or bucket on a bathroom counter or display table.
Position the Skeleton
Set the skeleton inside the tub, arranging its arms in a playful, relaxed position as if enjoying a bath.
Create the Bubbles
Fill the tub with batting or cotton filling to resemble overflowing bubbles.
3. Skeleton Trophies
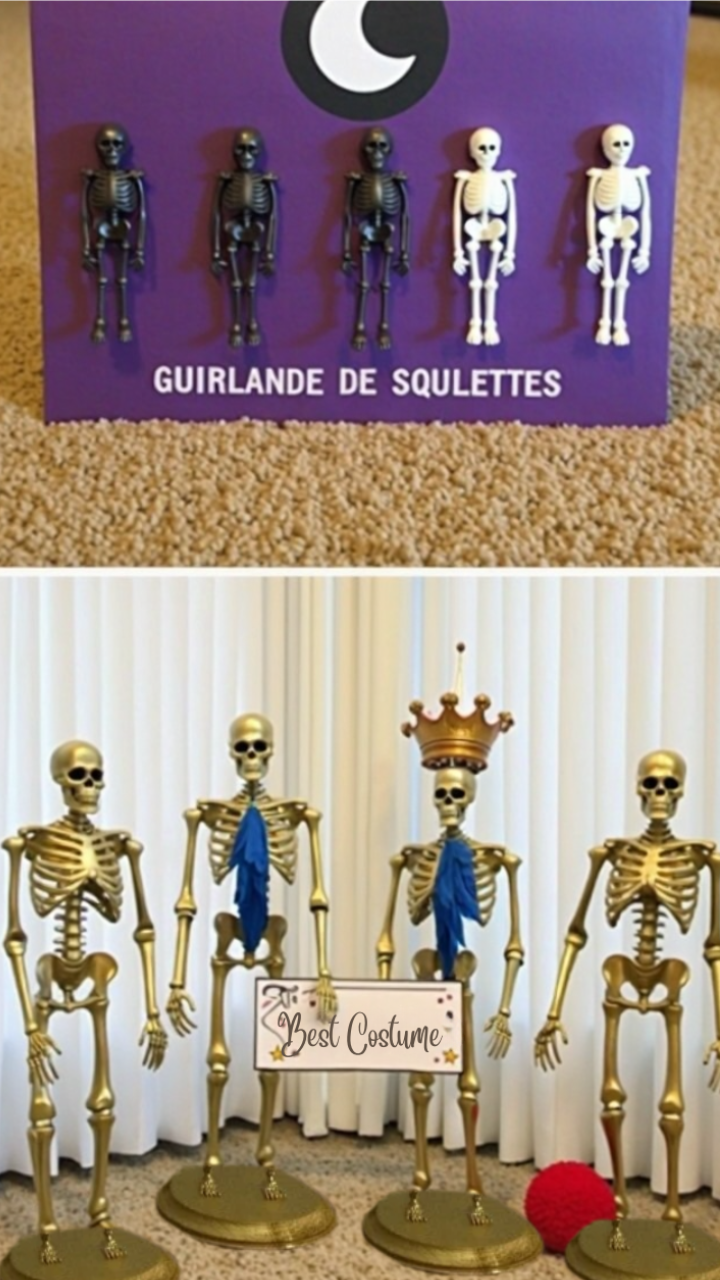
These trophies will come in handy for favors or prizes for costumes. They will also look great as centerpieces. Make them from dollar store skeletons, wood plaques, spray paint, glue, and sections of toilet paper rolls as the sashes.
Supplies
- Dollar store skeletons
- Wood plaques (for sturdy bases)
- Gold spray paint
- Hot glue gun and glue sticks
- Blue fabric or toilet paper rolls (cut into strips for sashes)
- Small crown accessory (optional for a “winner” look)
- Printed or handwritten award signs
Instructions
Paint the Skeletons and Bases
Spray paint the skeletons and wood plaques gold and allow to dry.
Attach the Skeletons to the Bases
Use hot glue to secure each skeleton to its wood plaque, ensuring they stand upright.
Create the Sashes
Cut sections of blue fabric or toilet paper rolls and drape them diagonally across the skeletons like award sashes.
Glue them in place.