If you’ve ever found yourself pondering other uses for empty wine bottles then these ideas will help you out. DIY wine bottle crafts are perfect for channeling your inner eco warrior. To top that off they are easy on your purse, and will spruce up any interior or exterior in a flash. There are so many possibilities of occasions and gifts that these craft ideas are ideal for. You could use them for DIY gifts, such as Easter gifts, Mother’s Day gifts, or a best friend’s birthday gift. You can also make them into vases or centerpieces as you wish.
It’s easy to transform wine bottles into lovely pieces of decor for Spring and Easter. They make great lamps if you put fairy lights inside. It’s also a great craft to do with kids – in fact it’s a fantastic excuse to have some good quality crafting time with the family. If you want, you can use different bottles and take inspiration from these wine bottles. You can make them for any time of year – just change the color scheme to suit your season.
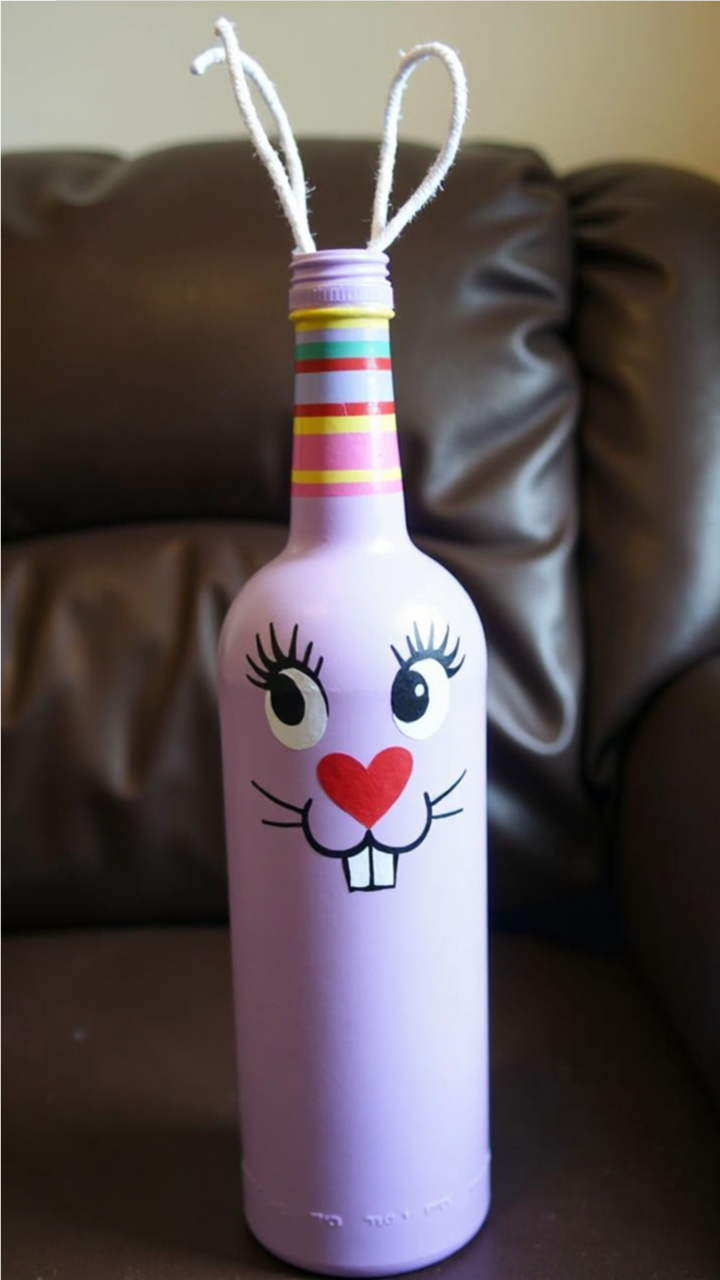
This DIY Easter Bunny Bottle Craft is so easy to make and will look fantastic in your home. You can make bunny ears from all sorts of materials, this idea makes use of pipe cleaners.
Supplies
- Empty Wine Bottle (cleaned and dried)
- Spray Paint or Acrylic Paint (pastel colors work best)
- Paintbrushes
- Black, White, and Red Acrylic Paint (for the face details)
- Pipe Cleaners (for bunny ears)
- Hot Glue Gun & Glue Sticks
Instructions
Spray paint the bottle in your chosen color and allow to dry. Next, use black paint to draw the bunny’s whiskers, eyelashes, and mouth. Make sure to paint big white eyes and add black pupils to give the bunny a cute expression. For the nose, use a red or pink heart shape. To make the bunny even more adorable, add two little square teeth. Finally, make bunny ears by bending two white pipe cleaners into loops. You can secure them to the top of the bottle using hot glue or by twisting them around the neck.
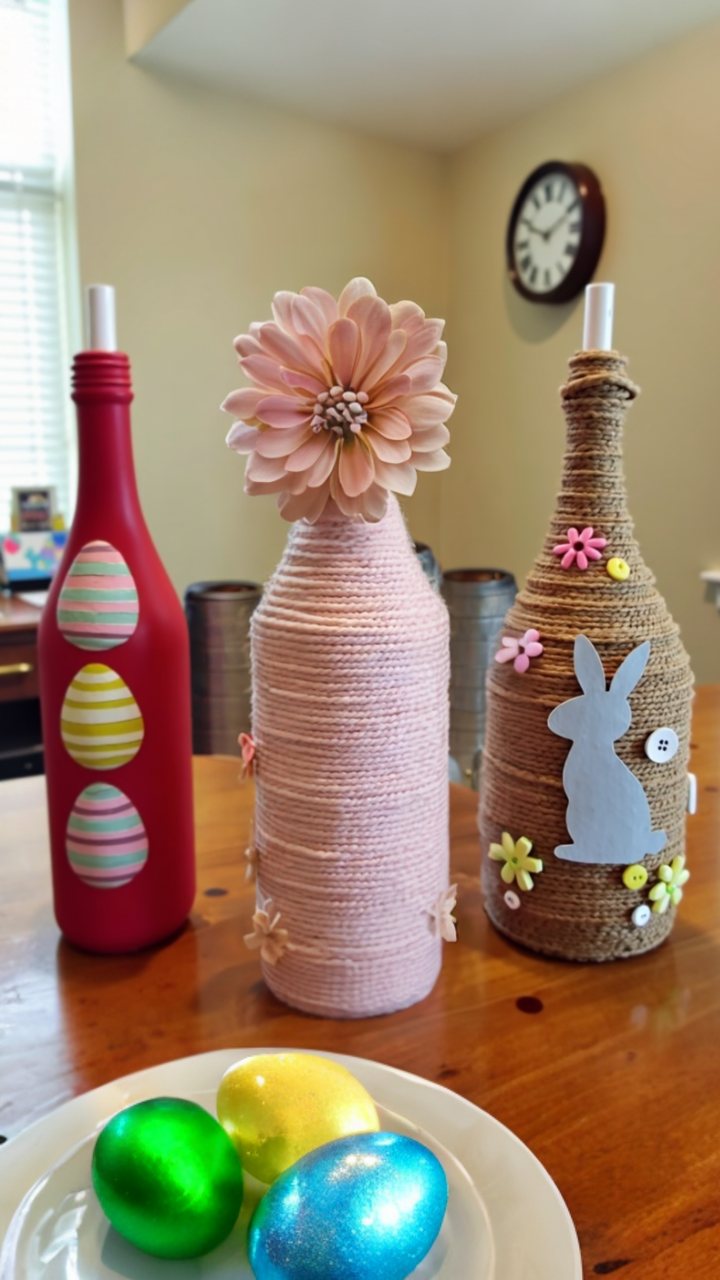
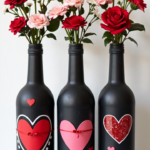
Turn wine bottles into vases by wrapping them with twine or painting them.
Supplies
- Empty Wine Bottles (cleaned and dried)
- Acrylic Paint or Spray Paint (pastel colors work best)
- Jute Twine or Yarn (in natural or pastel colors)
- Hot Glue Gun & Glue Sticks
- Scissors
- Decorative Elements (buttons, paper bunnies, faux flowers, stickers, or fabric cutouts)
- Mod Podge or Craft Glue
Instructions
You can make three different styles of bottles, like the ones shown in the picture:
1. Painted Bottle with Easter Egg Designs – for a bold and modern look.
2. Twine-Wrapped Bottle with a Bunny Silhouette – for a cozy farmhouse style.
3. Soft Yarn-Wrapped Bottle with a Flower Accent – for a delicate and romantic touch.
Option 1: Painted Easter Bottle with Egg Cutouts
Spray or paint the bottle in a bright Easter color, like red, yellow, or pastel pink. Let the paint dry completely. Then, cut out Easter egg shapes from pretty paper or fabric. Use Mod Podge or glue to stick them onto the bottle in a line up and down. Let it dry, and your Easter bottle is all done!
Option 2: Twine-Wrapped Bunny Bottle
Start by putting a little hot glue near the bottom of the bottle. Then, tightly wrap jute twine around the bottle, going up. Add more glue as you go to keep the twine in place. When the whole bottle is wrapped, cut a bunny shape out of craft paper or felt and glue it on. Make it even cuter by decorating with buttons or little fake flowers!
Option 3: Soft Yarn-Wrapped Floral Bottle
Wrap a wine bottle in pastel-colored yarn using the same method as the Twine-Wrapped Bunny Bottle. Secure the yarn with hot glue as you wrap. Next, attach a big fake flower to the top for a beautiful effect. You can also add smaller flowers or other pretty things around the bottle for a soft and elegant finish.

These “Happy Easter” upcycled wine bottles are the perfect addition to your holiday decor. They’re budget-friendly, fun to make, and a great way to repurpose old wine bottles into something beautiful!
Supplies
- Empty Wine Bottles
- Spray Paint or Acrylic Paint (pastel shades like purple, blue, pink, or yellow)
- Foam or Wooden Letters (to spell out “HAPPY” and “EASTER”)
- Hot Glue Gun & Glue Sticks
- Satin Ribbon (in a coordinating pastel color)
- Artificial Flowers & Decorative Easter Eggs (for a floral arrangement topper)
- Scissors
Instructions
First, pick your favorite light colors like purple, blue, pink, or green. Use spray paint to cover the bottles evenly. If you’re using acrylic paint, apply two coats with a brush for better coverage. Remember to let the bottles dry completely before moving on to the next step. Next, add some fun words to your bottles using foam or wooden letters. Write “HAPPY” on one bottle and “EASTER” on the other. Stack the letters vertically to make them look stylish and secure them with a hot glue gun. Finally, add some artificial flowers and Easter egg picks into each bottle to complete your beautiful Easter decorations!